LK portable arm with two-metre reach halves the time for inspecting large components
“We decided to stay with portable arm technology and this time chose LK, as we were keen to take advantage of the after-sales service for which they are known” – Greg Simmonds, Joint Owner and Director, GT Tooling
Founded in 2011, toolmaking and subcontract machining company GT Tooling (www.gttoolingltd.co.uk) spent one year using conventional manual metrology equipment to measure the components it was milling and turning before investing in a 3D articulating arm, a 6-axis model with a reach of 1.2 metres. Three years later when the company moved from Petersfield to a bigger factory unit in Fareham, the company invested in a machining centre with 1,651 x 762 x 762 mm travels, which meant that larger prismatic parts being produced had to be inspected in two operations.
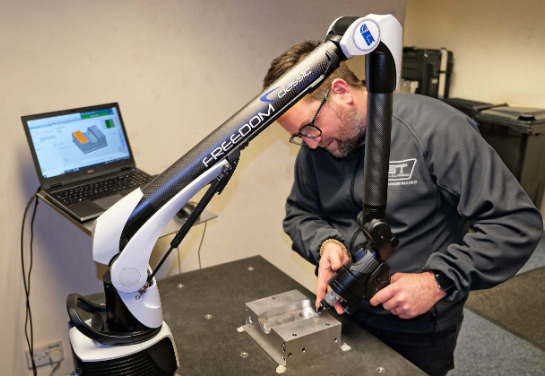
Although satisfactory, the procedure was time-consuming and risked the introduction of errors due to the necessity for arm relocation. So in May 2022, a FREEDOM Classis Scan portable arm with a reach of two metres was purchased from LK Metrology, Castle Donington (www.LKmetrology.com). GT Tooling was introduced to this UK coordinate measuring machine (CMM) manufacturer by nearby Mech Metrology & Power Tools, which calibrates the toolmaker’s inspection equipment and supplies it with conventional metrology tools such as verniers and micrometers.
Greg Simmonds, joint owner and director of GT Tooling commented, “We considered manually-operated and CNC CMMs. However, the repeatability of measurement on the former was not good enough while the latter did not offer sufficient flexibility of use. Neither type had the reporting capability that was up to our standards or those of our customers. We also felt that programmable CMMs were better suited to series production, whereas we machine mainly one-offs and small batches.
“We therefore decided to stay with portable arm technology, but instead of returning to the incumbent supplier we chose LK. We were keen to take advantage of the after-sales service for which they are known and we also like the PolyWorks Inspector reporting software supplied as standard with LK FREEDOM arms, which is particularly easy to use. Simply by pulling out the required dimensions and pressing a button, reports can be manipulated freely into different, easily-digestible formats to suit each customer’s preference.”
The precision engineering firm has held ISO 9001 quality management certification since the beginning and takes inspection and measurement very seriously, not least because it is heavily involved in supplying Formula 1 teams during the off-season. During that period motorsport accounts for a large proportion of factory throughput, mainly the manufacture of patterns, jigs, fixtures and aluminium soft tools for producing composite race car parts. Other industries served include aerospace, automotive, food and beverage, while rubber and injection moulds are manufactured in tool steel for a multitude of sectors. Stainless steel is also machined, as are exotic alloys, copper and its alloys, carbon fibre and engineering plastics.
Ryan Leaves, who doubles as a sales engineer and an inspector at GT Tooling explained, “Greg and I witnessed a one-hour presentation on the FREEDOM arm by LK engineers in Castle Donington. It took place online during the pandemic. The demonstration, which included use of the PolyWorks software, was carried out inspecting one of our parts that had been taken away during a previous meeting in Fareham. It showed how easy the equipment is to use and left me feeling relaxed that, even though I do not have a formal metrology background, I would be able to implement the new inspection system quickly.”

A CMM is inherently able to measure tolerances about 10 times smaller than an articulated arm, as positional feedback is from linear scales rather than absolute angle encoders within rotary joints. Nevertheless, the FREEDOM arm provides accurate results when GT Tooling is measuring dimensions to general drawing tolerances of ± 0.1mm. If there is a need to check tighter features, Mr Leaves uses conventional metrology involving bore and pin gauges, for example.
He confirmed that the entire quality control process using the arm, comprising alignment, inspection and reporting, is now faster and more flexible than previously due to the enhanced usability of the LK equipment. Speed is important, as some urgent jobs for F1 require a 24-hour turnaround. An internal report takes typically 15 to 20 minutes to prepare, while about one hour is required for a full FAIR (first article inspection report).
The reason these previously took longer was that the reporting element of the process to GT Tooling’s specification was more time-consuming. Where really significant savings are made is when inspecting large parts that previously required two arm set-ups. In these cases inspection time is halved, as Mr Leaves was essentially doing the job twice.

The main benefit of the new quality control procedure is that the resulting documentation is now exactly what the customer wants to see, without inclusion of unnecessary content and a consequent need for interpretation. GD&T (geometric dimensioning and tolerancing) reporting in particular, previously a laborious exercise, is notably more user-friendly with PolyWorks. The arm is used almost exclusively on a dedicated inspection table for checking components, but occasionally it is mounted on a machining centre table to verify the accuracy of a part before it is taken out of its fixture or prior to further metalcutting.
During pre-purchase discussions, it became clear that laser scanning as an adjunct to touch-probing of discrete points would be of considerable benefit to GT Tooling. It would allow much more comprehensive data to be collected on free-form surfaces in a fraction of the time and hence provide more comprehensive reporting and avoid any risk of machining errors being missed. It was for this reason that LK supplied a 7-axis FREEDOM arm rather than a 6-axis model, together with suitably configured software, as the extra degree of freedom is necessary to enable laser scanning when the additional investment can be justified.
A further benefit of laser scanning will be inspection of delicate and deformable components, including rubber parts such as car door seals, without fear of damaging or deforming them in the process. Yet another advantage will be the ability to reverse engineer legacy components, such as for vintage cars, for which no data or drawings exist. It will be possible not only to use this capability on parts machined in-house, with the opportunity to win new customers as a result, but also to sell an inspection service to other manufacturers on a subcontract basis if there is spare capacity.

Mr Simmonds concluded, “Until now, we have produced inspection reports on about 40 percent of our machined components, as not every end user requires one. Now that the process is so much quicker and easier with the LK arm, we are looking to more than double the number, as it reflects well on the service we provide, gives customers confidence and may result in extra business.
“I would like to place on record that the PolyWorks software has proven to be even better than we were expecting and the company’s telephone advice is excellent, as is LK’s. This is key for us, as we often have to provide a quick service, especially to F1, and we cannot afford to have our inspection function down for long should we have a problem.”

